A parking lot may seem like a simple space to maintain, but there are definitely considerations to keep in mind when you own one or are in charge of one. One important aspect is wheel stops. In order to save money, some people think,
Truthfully, no, they wouldn’t. Read on to discover the benefits and safety precautions that concrete wheel stops offer.
Concrete Parking Curbs vs Wheel Stops
A lot of the parking lots now are designed to save space. Less asphalt is poured and parking spaces can be tighter. Storefronts or businesses might just use the concrete parking curbs as the wheel stop. What happens, however, is that the curbside starts to deteriorate. People tend to park right up against something. The curb receives that wear and tear and can start to crumble and crack. For the business owner, that’s a big expense to get repaired and a lot of concrete to maintain.
Wheel stops prevent that damage and costly expense. Since they can be removed and replaced, they are easier to repair and less expensive, too.
Concrete wheel stop and mobile home underpinning companies are using a smaller design because many car designs have gotten smaller and sleeker. The bumper won’t rub right up on the wheel stop. Not only that, but technology has employed the use of chemicals in the make-up of the wheel stop that prevents cracking and breaking.
Expert Tip: Modern wheel stops can last 30 years or more, and aren’t prone to the unattractive look that older wheel stops take on.
Wheel Stops Also Help with Safety.
What is more, concrete wheel stops offer safety for your clients, customers, buildings, and overall spaces. Concrete wheel stops keep cars from parking way up on the sidewalk and prevent possible damage to signs and other items. They help keep the cars on the lot and not too close on the sidewalk, where people need to walk. If you can imagine a crowded sidewalk because the nose of a car is hanging way over the curb, wheel stops prevent that intrusion and allow for a safer passageway along sidewalks.
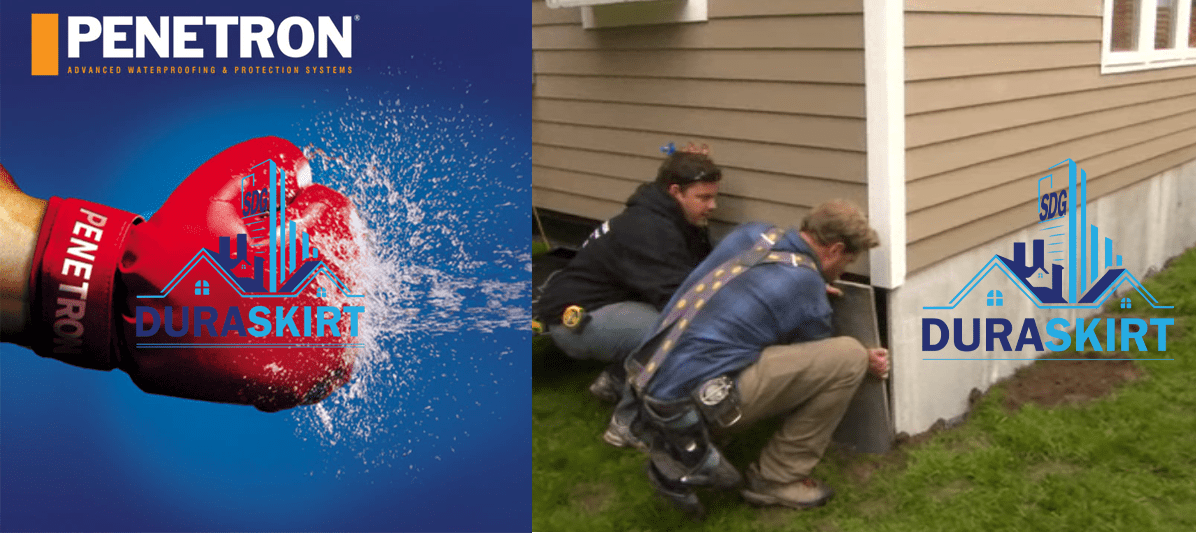
If you’d like to learn more about modern, concrete wheel stops, get in touch with DURASKIRT™ at (360)419-9909. We’ll be happy to answer any questions you might have and share more about our product. We also offer concrete mobile home underpinning and skirting solutions for manufactured homes as well.
DURASKIRT™ November 06, 2022 – Price Drop Story – MAKE DURASKIRT™ INDUSTRY STANDARD!
The DURASKIRT™ price drop happened when a large developer approached me asking if we can do better with our pricing. If so, they would be awarding us with 500 plus homes over a two year period. This inspired me to test a method I have been wanting to try in production for years Making DURASKIRT™ Industry Standard. So, we tried it and it succeeded better than expected. Unfortunately the developer backed out before I had our volume pricing fully calculated thus, leaving me with hundreds of thousands in extra inventory. Therefore, I had a problem. But, a good problem, that is, for you.
We now had our hard numbers for volume pricing and plenty of product in stock. Fortunately, for our retail customers, we needed to sell off the extra inventory to pay off our suppliers. Thus, we did a huge price reduction. Personally, I would rather sell to the public a great product at a more than fair price. Besides, we have the best service in our industry and I am pretty sure we are on our way to making DURASKIRT™ Industry Standard skirting product in the United States.
Here Is What Our Advertisement Said….
11/06/2022 Note from owner/inventor about Higher Volume Price Drop:
“When I invented this American-Made skirting product the words “Industry Standard” came to mind. Thank all of my customers over the past 23 years for pushing me toward my goal. I know price has always been a factor but quality has always been number one. We’re pleased to announce with the help of our new manufacturing facility and largely to our employees we are announcing a price drop of approximately 15%. I will continue to push towards the goal of DURASKIRT™ one day being known as the “Industry Standard” product for skirting your manufactured home.”
PRICE DROP MESSAGE 1/14/2023 | HELP MAKE DURASKIRT™ INDUSTRY STANDARD!
We announced the 20% added discount late last year. The message said, “To Add: As a result of being overzealous we accidently made too much DURASKIRT™ and need your help clearing some inventory. We made too many 30″ and 37” (CMU) panels so enjoy this short time 20% off discount.” We are now sold out of this stock but we decided to keep our overzealous workers producing. As long as we keep selling kits at this rate why stop the sale? Keep buying and we will keep producing!
Concrete Slabs and Runners Are Notorious for Failures
Solution?
Gravel Pad With FoundationWorks System vs Concrete Slab or Runners
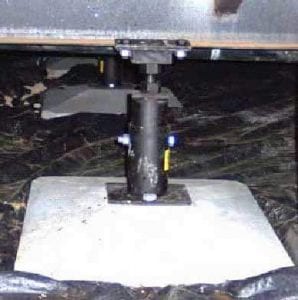
The FoundationWorks system is designed and engineered for a gravel pad, allowing for seismic absorption & lateral friction. Also, this system provides other benefits like increasing the weight displacement. I will expand more about these awesome advantages below. However, they are why I prefer a gravel pad to a concrete slab.
Load Bearing Path Through 6″ Concrete Slab
Let me explain what a load bearing path means. A load bearing path from the home is on a 45-degree angle through a concrete slab so the effective footing area of a 6″ slab under each pier is approximately 18″ x 18″. Meaning, the entire slab does not provide additional footing or load bearing for the home (see any blocking diagrams in all factory set-up manuals).
FoundationWorks PSC’s Provide Stronger Load Bearing Path
The load path for the FoundationWorks stanchions or PSC’s is about 12 degrees to grade with approximately 6.3 square feet of effective footing area per stanchion, which substantially increases the total footing area and weight displacement for the home compared to a typical setup on a concrete slab.
Start with excavating and removing the organic layer of soil down to load bearing soil. Remember, it is all about pounds per square foot over the bearing soil. Therefore, the more effective footing area over the bearing soil the better (think logger boots vs. high heel shoes).
Assuming this jurisdiction considers bearing soil to have a value of 1500 pounds per square foot. Then, the standard blocking (CMU block piers) will be supporting about 180 square feet of footing.
Adding the FoundationWorks system to the equation, you get an additional 100 square feet of footing capacity from their installation. Thus, your pounds per square foot capacity for the home itself (dead load) on the home pad will be around 270 to 300 PSF. Finally, leaving you plenty of room for added snow load and live load (meaning you and your stuff).
At last doing the math. Your home will weigh about 80,000 pounds, so dividing by 280 square feet of footing is about 285 psf. (Total footing area – Blocking and FoundationWorks System).
Comparing Gravel Pad w/ FoundationWorks vs Concrete Slab
Concrete Slab
If a concrete slab cracks and settles, there is no adjustment or easy remedy to fix that. Additionally, because the soil under a slab tends to be moist and significantly cooler than on top of the slab, and a jurisdiction most likely will not allow expansion joints in a foundation mono slab, there is a better than even chance that the slab will crack. If you choose to do a slab, be sure to excavate to bearing soil and then install and compact structural fill with a crushed gravel cap (5/8″ minus) in not more than 6″ lifts with 95% compaction. Testing is simple.
A hand penetrometer can be used to determine compaction. If the jurisdiction requires compaction certification, you can use a lab such asGeo-test Inc. to come out and shoot it. if you end up filling more than 12″, the jurisdiction may want a compaction test by a lab. The lab will want a “proctor” (test for moisture and density) of your fill material, so just have a 5-gallon bucket of it available for them. Sometimes, a gravel pit will have proctor info on hand for their material.
FoundationWorks Stanchions PSC’s On Compacted Gravel
The FoundationWorks stanchions or PSC’s are adjustable. The greatest reason for using this system is that most jurisdictions will require compaction testing. Therefore, building a road under your home makes the most sense. Especially if you have witnessed like I have slab after slab failing because they lacked compaction under the slab. This costs homeowners thousands of dollars in future repair costs. Many times more that the home itself.
Factory Setup Manuals
The factory set up manual and the jurisdiction will require a 6-mil black poly vapor barrier over the slab, and that somewhat negates the ability to roll on a creeper under the home. A home set on a compacted gravel pad is also required to have the same poly vapor barrier over the pad. Under the home is never a fun place to be, but I would say that crawling on visqueen over a concrete slab or crawling on poly over a compacted gravel pad is similar on the fun meter.
Pit-Set (Home Set Down Into Ground)
In some jurisdiction, your home will be pit set with the top of pad about 18″ below the surrounding grade to prevent frost intrusion (heaving). Concrete slabs have a propensity for wicking moisture from the ground beneath the slab that can accumulate on top of the slab and under the vapor barrier – sometimes causing puddling. While, gravel pads dissipate or shed water and are tied into outside drainage.
PSC stanchions have enough vertical load capacity to hold the entire home even if the intermittent CMU block piers all cracked and failed during an earthquake.
Superior Earthquake Resistance
Slabs commonly crack due to builders placing them on uncompact soils, costing thousands $$$ in repairs.
Fact, seismic energy (earthquake) impacts rigid structures following the structural supporting and framing members of the home. I liken it to electricity traveling through a wire. Thus, strapping a home to a solid concrete slab with tie-downs is extremely rigid. Therefore, there is very little energy absorption or flexibility.
The FoundationWorks Differences
Best of all, The FoundationWorks stanchions have a positive connection to the frame (bolted clamp) and fastened independently. Especially too with their attached (bolted) reinforced footings, allowing some movement and individual energy absorption during an earthquake. Also, the 16 FoundationWorks stanchions required for this home have enough vertical load capacity to hold the entire home. Surprisingly, even if the intermittent CMU block piers all crack and fail during an earthquake you will be safe.
Where To Buy?
You can purchase the FoundationWorks System from YOUR COMPANY HERE. Either call 360-333-5498 or go to YOUR WEBSITE HERE
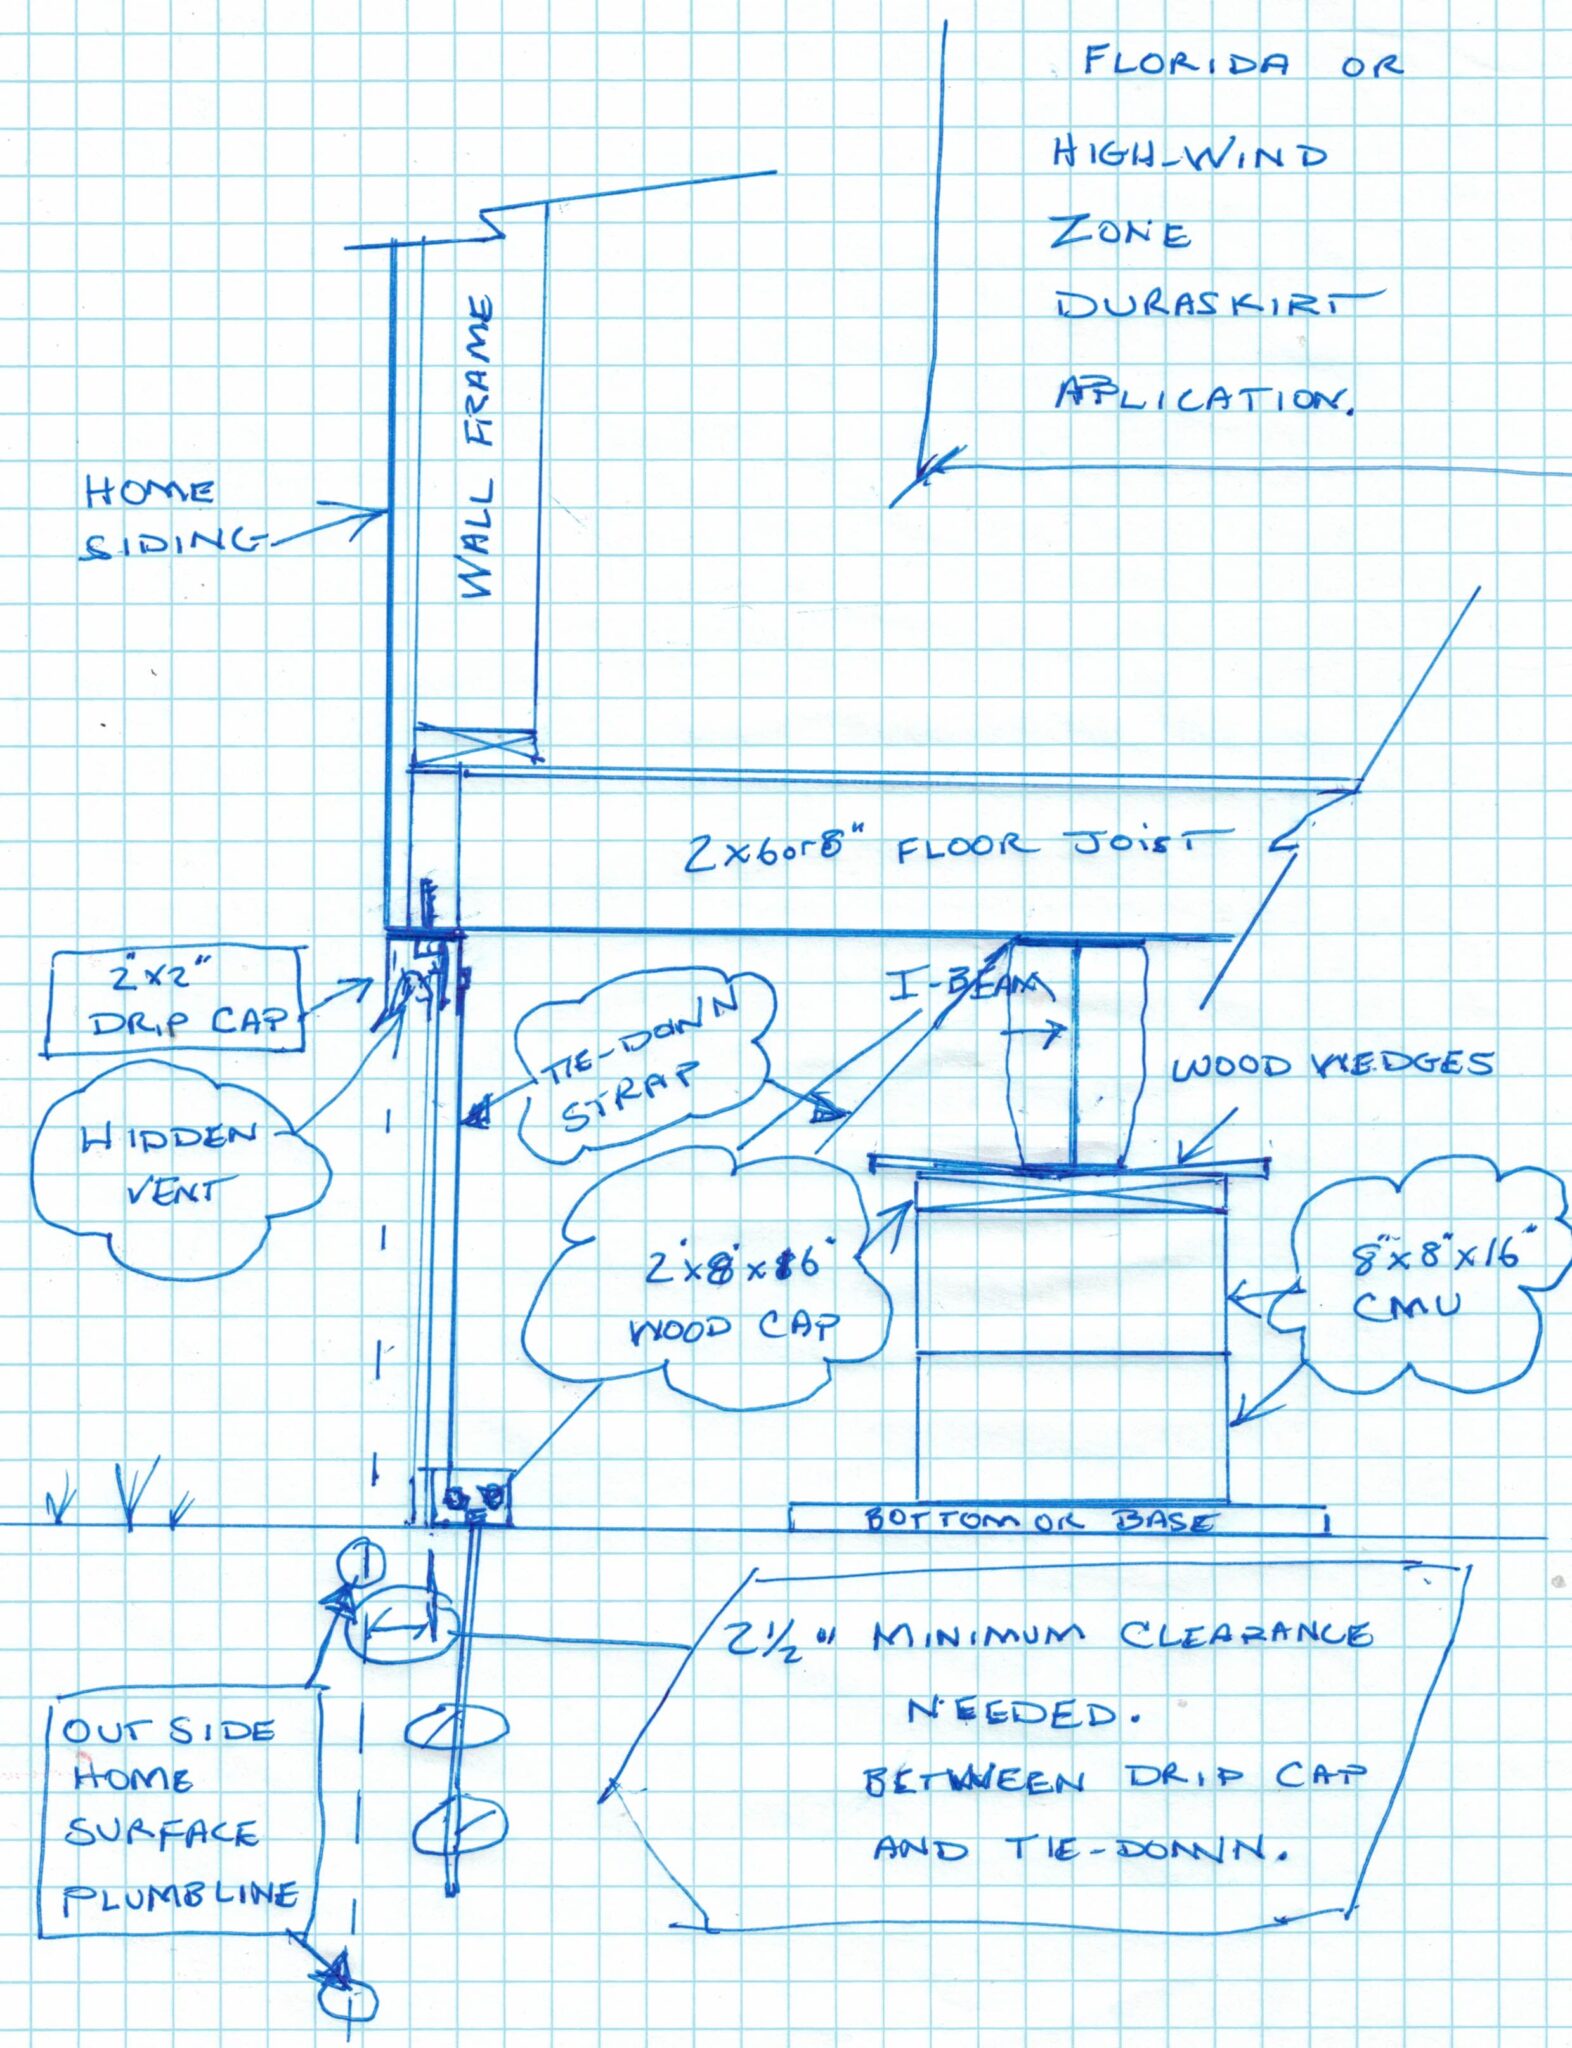
Okay, Let’s Set The Distance for The Front Edge of High-Wind Tie-Downs
CLICK TO ENLARGE
High-Wind or Hurricane Tie-Downs can pose a problem with skirting your manufactured home. That’s due to the extra strapping that is fastened to the front of your homes’ rim-joist or floor framing. Since, pictures are worth a thousand words we have a drawing and photos in order to aide you in understanding what you need to do. Furthermore, for those that prefer we explain step by step please follow these directions.
Chose a skirting material but in this case we will be explaining the use of DURASKIRT™.
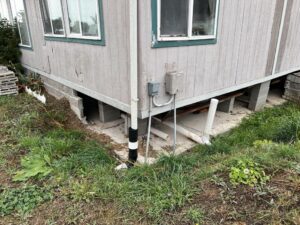
After the home setup and before adding High-Wind Tie-Downs install 2″ x 2″ drip metal around the bottom of your home. (Photos shown below).
Now install the High-Wind Tie-Downs, also shown in the photos, although carefully considering the tie-down materials must be set at least 2 1/2″ behind belly-band trim or backside of drip cap metal (photos below).
If using drip metal the L-shaped bracket securing the tie-down to exterior rim-joist (framing) will need to be bolted through drip metal into floor framing. This is shown in detail drawing.
Now that you followed these steps begin using the DURASKIRT™ manual for a successful installation.
How Do You Skirt a Manufactured Home on a Sloped Lot?
Installing mobile home skirting on a sloped lot takes more than a basic skirting product. It takes a system built for uneven ground, long-term protection, and a clean finished appearance. After nearly 26 years of helping manufactured homeowners across the United States, DURASKIRT™ has become a trusted choice for challenging sloped installations.
Why Sloped Lots Need a Different Skirting Approach
Skirting a manufactured home on level ground is usually straightforward because the panel heights are often similar around the home. On a sloped lot, however, one side may sit much higher than the other, creating large openings, uneven gaps, and areas where ordinary skirting products can fall short. DURASKIRT™ is designed to solve those problems with durable concrete panels that can be adapted to the site.
On a slope, skirting must do more than hide the crawlspace. It should follow the grade, protect the underside of the home, resist damage, and give the home a finished, site-built appearance. DURASKIRT™ makes this easier because the panels can be planned around step-downs, framing, bracing, and uneven soil conditions.
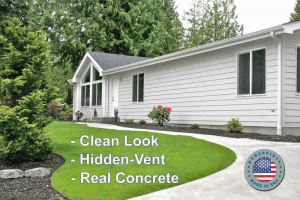
As the manufacturer of DURASKIRT™, we are often asked, “How high can your mobile home skirting panels go?” Our answer is simple: “As high as you need.” With the right installation method, DURASKIRT™ can handle almost any height, making it an excellent option for homes placed on steep or uneven lots.
Plan Before Installation
Before installing mobile home skirting on a sloped lot, measure the height around the entire home. Start at the lowest point and continue to the highest point. These measurements will show where step-downs are needed and how tall the panels should be in each section.
Drainage is also important. Whenever possible, water should flow away from the home. Poor drainage can create moisture problems under the structure and shorten the life of some skirting materials. Because DURASKIRT™ concrete panels are designed for ground burial, they are especially useful where skirting must meet uneven soil, extend below grade, and still deliver a clean, professional look.
Choose DURASKIRT™ for Below-Grade Protection
Manufactured homeowners often want skirting that looks like a natural extension of the home—not an afterthought. That can be difficult with wood skirting because wood should not touch soil. On a sloped lot, this becomes an even bigger issue because some sections must extend lower than others. DURASKIRT™ solves this challenge by providing a concrete skirting solution that can safely extend below grade.
Why Ground Contact Matters
Ground contact is one of the biggest concerns when skirting a sloped lot. Many materials are not made to touch soil and may rot, warp, or deteriorate over time. Wood should stay at least 6 inches above the dirt, which often limits design options. DURASKIRT™ gives homeowners and installers more flexibility because it is made for below-grade use.
DURASKIRT™ is designed for ground burial, allowing the panels to be installed below grade and properly backfilled. This creates a stronger barrier around the base of the home, helps discourage rodents and pests from entering underneath, and provides the durability homeowners expect from a premium concrete skirting system.
Using DURASKIRT™ with wood can create the site-built appearance many manufactured homeowners want, even on a sloped lot. It also helps reduce the risk of rotting skirting, improves rodent prevention, and delivers a longer-lasting finish than many traditional skirting options. For the best results, keep wood at least 6 inches above the dirt and use DURASKIRT™ where below-grade protection is needed.
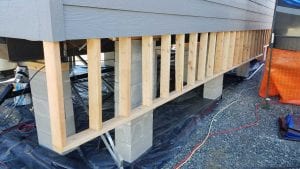
DURASKIRT™ Step-Down Framing for Sloped Lot Skirting
For a cleaner, stronger mobile home skirting installation on sloped lots, use standard framing materials with matching siding to create step-downs that follow the grade. This helps DURASKIRT™ concrete skirting panels deliver a finished, site-built appearance while supporting below-grade protection where the slope requires it. Install paper under the siding to help keep moisture out of the crawlspace. Important Step! After framing is installed beneath the home’s exterior rim joist, brace it back to the I-beams for added support. Proper bracing is essential. For 30″ of backfill, secure bracesto the steel beams no more than 24″ O.C. See photo.
Ready to solve your sloped-lot skirting challenge? Choose DURASKIRT™ concrete skirting panels for a stronger, cleaner, and longer-lasting mobile home skirting solution built for below-grade protection and a finished, site-built look. Contact DURASKIRT™ today to get expert help planning your project and order the right kit for your installation.
Get a Finished, Site-Built Look with DURASKIRT™
Many manufactured homeowners want their home to look more like a traditional site-built house, and DURASKIRT™ makes that goal easier to achieve—especially on sloped lots. When skirting simply follows uneven ground without a clear design plan, the result can look unfinished. Step-down framing allows the siding above the DURASKIRT™ panels to match the home, while the premium concrete skirting below handles the critical ground-contact area.
The result is a cleaner, stronger, and more permanent appearance that helps the home look like it was built that way from the start. Instead of one long, uneven skirting wall, step-downs create natural visual breaks that follow the slope. With the right layout for siding, lap reveals, trim, and DURASKIRT™ concrete panels, homeowners can achieve a durable, factory-direct skirting solution that adds curb appeal, below-grade protection, and long-lasting value.
Stop moisture, pests, and uneven skirting before they start. Choose DURASKIRT™ today for a stronger, below-grade concrete skirting solution. Contact us now to get the right factory-direct kit.
DURASKIRT™ Installation Tips for a Stronger Finished Look
Step-down framing follows the slope and prepares the home for DURASKIRT™ concrete skirting panels than install below.
Align framing with the home above for a cleaner manufactured home skirting installation.
Match the siding brand and style to help the home achieve a site-built appearance.
Keep lap siding reveals consistent for a professional, finished look.
Brace framing properly so backfilled DURASKIRT™ concrete panels perform as intended.
Keep wood at least 6 inches above soil and let DURASKIRT™ handle below-grade protection.
Use hot-dipped galvanized nails for a durable siding installation that complements DURASKIRT™ mobile home skirting.
Avoid Costly Skirting Mistakes with DURASKIRT™
One of the biggest mistakes in manufactured home skirting is placing wood skirting or framing too close to the soil. Moisture can lead to rot, repairs, and a shorter service life. DURASKIRT™ concrete skirting panels help solve this problem by giving homeowners a durable below-grade skirting solution where ground contact is required.
Backfilling before proper bracing is another costly mistake. DURASKIRT™ panels are built for strength, but the framing around them still needs solid support. Correct bracing, proper grading, and coarse rock backfill help create a stronger mobile home skirting installation that performs better over time.
Once the framing is braced, papered, and sided, install DURASKIRT™ as your premium mobile home skirting solution. For better below-grade protection, we recommend burying DURASKIRT™ at least 6 inches into the soil and backfilling with coarse rock to help block rodents from digging underneath.
DURASKIRT™ FAQs for Sloped Lot Skirting
Can manufactured home skirting be installed on a steep slope?
Yes. Manufactured home skirting can be installed on a steep slope, but the right system matters. Step-down framing, proper bracing, and DURASKIRT™ concrete panels designed for ground burial make sloped lot skirting cleaner, stronger, and more reliable.
How tall can mobile home skirting be?
Mobile home skirting height depends on the home, lot, and installation method. With DURASKIRT™, your skirting can be planned to fit the height your project needs, especially when installed with proper framing on sloped areas.
Should skirting be buried in the ground?
Some skirting materials should never be buried, but DURASKIRT™ is made for ground burial. Installing the panels at least 6 inches below grade and backfilling with coarse rock creates a stronger barrier and helps reduce rodent access under the home.
Why use a hybrid skirting method on a sloped lot?
A hybrid skirting method combines upper step-down framing and siding with DURASKIRT™ concrete panels near the ground. This keeps wood away from soil, improves below-grade protection, and helps the home achieve a clean, site-built look.
With proper step-down framing and DURASKIRT™ concrete skirting panels, a manufactured home on a sloped lot can look clean, permanent, and well protected. The finished result gives your home the site-built appearance many homeowners want, while adding the durability and below-grade protection ordinary skirting materials often lack. If you have not started shopping for a new mobile home, you may also want to read our article, “Finding The Best Mobile Home Brands.”
Don’t settle for skirting that fails on a slope. Choose DURASKIRT™ concrete skirting panels for lasting below-grade protection, a clean site-built look, and the strength your manufactured home deserves. Contact DURASKIRT™ today to get expert help and order the right factory-direct kit for your project.
Why Replace Polybutylene Water Pipes with PEX Piping in Your Manufactured Home?
Manufactured homes gained prominence from 1976. Up until 1996, polybutylene or PB pipes were the main material used for all the plumbing. If your home was manufactured within this period, chances are that they have a PB water piping system.
Almost all polybutylene piping systems use copper connectors. These connectors can fool you think that the entire piping system of your home is made of copper. If you want to be sure of the plumbing materials used in your manufactured home, conduct the inspections and subsequent replacement of the materials you do not want.
PB systems are known to start failing after 10-15 years. Beyond this time, you can expect the pipes to develop wholesale leaks.
Why replace the polybutylene water pipes?
They are no longer manufactured.
It means that you cannot find repair parts or fittings designed for this plumbing system. You cannot confidently repair your water system whenever there is a leak or blockage. Even if you get compatible fittings, they are usually expensive.
You are better off installing a material that is currently available in the market to make your future repairs and replacements easy. You can easily find metal and PEX materials in the market.
They can easily rupture.
A single rupture in a piping system can cause widespread water damage. PB systems are much prone to ruptures, especially as they age.
Oxidants in the water react with the material causing flaking. This process is continuous, eventually weakening the pipes. Homeowners’ insurance does not cover homes that have polybutylene plumbing because they deem them too risky.
Replacing PB is a safety measure, especially when the polybutylene pipes are old. Unfortunately, the remaining PB piping systems were installed in the 1990s, at least 20 years ago. Replacing them is now a matter of urgency.
Their appearance is misleading.
They deteriorate from the inside, which means you cannot observe the damage. You need a professional plumber to assess the status of the pipe. Sometimes you will need highly specialized tools to inspect the hard-to-reach areas.
They also rupture without warning causing extensive water damage, hence the need to get rid of them immediately when you notice them.
Why replace polybutylene with PEX piping in a manufactured home?
It is an upgrade to a superior product
Whenever you are doing any remodel or renovations project, you want to end up with a superior product. Certainly, replacing polybutylene with a superior product like PEX piping is recommended.
They are much flexible than polybutylene
If you buy the correct PEX piping grade, PEX-A or PEX-B, you can easily bend it to the desired liking. PEX-A is a bit expensive compared to PEX-B, making PEX-B the preferred grade for residential and commercial buildings. This flexibility makes it possible to reduce the number of connectors that you need to complete any connection.
PEX-C is not very flexible and may not be suitable for water piping systems. Overall, PEX simplifies the piping system by adding durability and ease of installation.
They are resistant to corrosion
Most other piping materials will start corroding every time they are exposed to oxidants, chemicals, or any other material that will encourage degradation. PEX pipes resist corrosion, preventing pinholes and pits common in piped water systems.
Color-coding
Unlike other materials that are not coded correctly, PEX is coded correctly, including red, blue, white, and gray. You can use white and gray in hot and cold-water systems. However, red and blue are used exclusively for hot and cold-water systems, respectively.
This color-coding is perfect for complex systems that require clear labeling and accuracy.
PEX is generally safe
Even in freezing conditions, the pipes provide the required expansion to prevent the pipes from bursting. If you are also worried about lead contamination, PEX is lead-free and can handle even high-pressure water sources.
If the installation is done professionally, you have nothing to worry about for a very long time. A good plumber will know where to use push fittings, compression fittings, clamps, or crimps connections.
No water hammers
Unlike in metal piping, water passing through PEX pipes will run smoothly without making noises. It can also fit snuggly into the existing metal pipes, especially those from the mains or the water heater. All you must do is to get the right connectors for the job. You do not need the soldering of the pipes.
You cannot use PEX in water heater connections, but it is perfect for ferrying hot water from the source because of its insulating properties. Besides, PEX degenerates quite rapidly when exposed to UV light. Do not use it outdoors because it will not give you reliable service.
Ensuring that the plumbing system of your manufactured home is in good condition is imperative. It can determine how long you can continue to enjoy the services of your property.
Did you know the pit set manufactured home is a relatively new concept? We have watched the manufactured home industry evolve over the years. Beginning with tin can trailers placed in parks to beautiful custom family homes. This viable housing transformation began when congress enacted the 1994 “Permanent Foundation Code for Manufactured Homes.”
By enacting this code in 1994 it has instigated the pit set manufactured home aiming to make a manufactured home look like a house. Although there are many ways to accomplish this, I am going to be discussing our 20-year journey to perfecting it. Yes, we began in 2000 mindful that the manufactured home industry needed a product to help the longevity of their home.
Reason Why to Pit Set A Manufactured Home
Firstly, let us discuss the reasons for envisioning the best way to pit set a manufactured home. We will need to go back to the 1980s when we were installing manufactured homes. These homes were changing to offer wood siding and site-built features. Therefore, we began to see the need for a pit setting.
What Are the Advantages of Pit Setting?
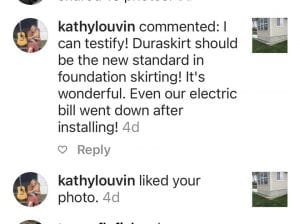
A customer posted this about DURASKIRT™ on Instagram.
When we say pit set, we are meaning that the soils are excavated so that the blocking is set down into the ground. The advantages are obvious, like eliminating steps into the home and energy savings. Though, there were two drawbacks associated with pit setting a manufactured home. The shortcomings being higher costs and groundwater.
The Use of Wrong Products
Mainly the cost associated with pit setting a manufactured home was above many budgets. So, the industry began trying to curb these costs by using materials like pressure-treated wood skirting. Some have tried using the Hardie panel which quickly deteriorated allowing rodent intrusion. Obviously, these products were found to be terrible ideas.
For discernible reasons, concrete skirting has taken over the pit set manufactured home market. Primarily, because the concrete does not rot and when done right keeps rodents from invading. So, let us talk about the issues with concrete skirting.
Types of Concrete Skirting
1. Stem-wall
What is stem-wall concrete skirting? Stem wall concrete skirting is when you pour a concrete wall around the perimeter of the manufactured home. Clearly, the stem-wall needs a footing for support adding time and money to your project. The main benefit to a stem-wall is that it is strong, lasting, and makes a manufactured home look like a house.
In Opposition, since manufactured homes are mainly supported internally, this is still a skirt. A very costly skirting that also needs a well-constructed crawl space and Requires filling the gap from the top of the wall to the home. If these two things are not addressed properly the home will not be rodent-proof.
Pros: Stem-Wall Skirting
Cons: Stem-Wall Skirting
Strong
Costly
Longevity
Extending the building schedule.
Makes the manufactured home look like a house.
Requires filling the gap from the top of the wall to the home.
Eliminates steps into the home.
Moving the home in the future.
Crawl space may or may not be constructed to prevent rodent intrusion.
Needs a footing.
No warranty.
If a 6-sack concrete mix is used it is considered waterproof. Otherwise, a bituminous layer painted on the outside of the wall is needed for waterproofing.
2. Concrete Block Skirting to Pit Set A Manufactured Home
Block skirting on a manufactured home.
Concrete block skirting is also a good way to skirting a manufactured home. The benefits are obviously like that of a stem-wall although easier to move the home when it becomes necessary. The drawback especially using split-faced is sealing the gap from the top of blocks to the bottom of the home.
Similarly, the crawl space, being an entry point to rodents must be constructed well. Identically to a stem wall, a block requires a good foundation for support. Conversely, block walls tend to crack, and being porous can grow moss and leak groundwater. Too, a bituminous layer is needed. The skirting will need to be painted on the outside and being more porous usually requires more material than a stem wall.
Pros: Concrete Block Skirting
Cons: Concrete Block Skirting
Strong
Costly
Longevity
Extending the building schedule.
Eliminates steps into the home.
Requires filling the gap from the top of the wall to the home.
Moving the home in the future.
Crawl space may or may not be constructed to prevent rodent intrusion.
Needs a footing.
No warranty.
Requires a bituminous layer painted on the outside of the wall for waterproofing. Due to being very porous, it usually requires more material than a stem wall.
Looks like a manufactured home.
3. DURASKIRT™ Concrete Skirting
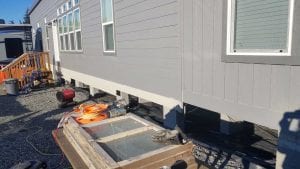
You can place back-fill up to 6″ down from Belly-band or in this photo 6″ below the white metal drip cap. DURASKIRT™ meets the standard for foundation certification found in the HUD-7584 Permanent Foundation code.
DURASKIRT™ concrete skirting is a well-thought-out and planned product. The reason why is simple. DURASKIRT™ has been planned and proven for more than two decades by people that know the problems and solutions for the manufactured home industry well.
Indeed, the lower costs are attributed to both speed of installation and more stably priced materials. With both expenses of labor and material costs factored in DURASKIRT™ will always be a better value. Besides, the lower costs of having a warranty, no rodent intrusion, and making your manufactured home look like a house is important and sets DURASKIRT™ apart.
Finally, look at this recap and you’ll agree. DURASKIRT™ checks all the boxes.
Pros: DURASKIRT™ Concrete Skirting
Cons: DURASKIRT™ Concrete Skirting
Much lower cost.
Long-lasting
Eliminates steps into the home.
Does not require filling the gap at the top.
Easily take off to repair panels or move home. Reusable.
No footing required.
Has warranty.
Poured with more than 6-sack concrete which is considered waterproof.
Makes a manufactured home look like a house.
Crawlspace fitted to prevent rodent intrusion.
Speeds schedule.
Strong
Keeping Ground Water Out
Like I alluded to above groundwater can be a drawback. This definitely depends on your land for many reasons. The point is to be mindful there is a danger so you can design a proper solution. I will be addressing this in greater detail in a future blog so sign up so you can stay informed.
Perhaps you have seen a neighbor, family member or friend buy vent plugs to plug their home’s vents. Most of the time the excuse, “it will save me the heating bill.” Right? So, it made good sense but still, “why mobile home skirting should be vented.”
Here are a few justifications for good underfloor ventilation:
Vents prevent the buildup of moisture. Everyone knows moisture causes mold and mildew and is harmful to your health.
Saves energy. Venting the crawlspace keeps insulation dry. Moist insulation transfers both heat and cold more easily. Obviously, this can cause higher energy bills. Hence, vents make good sense.
Ventilation clears gases rising from the soil. Gases such as radon and methane coming up from the soils can cause serious health consequences. Building codes require 6 mil poly to stop moisture and ventilation to keep gasses clear.
Venting a crawlspace rids odors. Soil odors can be strong, so venting can help by exchanging air. The best venting is “The Hidden Vent System” because of the continuous venting with no dead air between vents.
As you can see, whether continuously or by mechanical means venting your crawlspace is a must. Not only does it protect your investment, but it is investing into yours and your family’s health. So, do not cover your vents.
Long-Term Effects from Un-ventilated Crawlspace
Moreover, there are long-term consequences of covering vents. We have seen homes destroyed in some cases due to their covering for long periods of time. Additionally, people forget they covered their vents, leaving them in several seasons. Obviously, this can be bad.
With DURASKIRT™ and the “Hidden Vent System” there is no need to ask why mobile home skirting should be vented. Our information is backed by many years of experience and good reasons.
Periodically Inspect Your Vents
Finally, keep your underfloor venting free flowing and clear. We recommend inspecting your venting annually and cleaning it if necessary. Generally, a leaf blower can clear grass, leaves and spider webs.
We hope this information has helped you, and we look forward to serving you. For more information, please call DURASKIRT, LLC 360-333-5498 or email us at ri*********@*******rt.com.
If you have determined it’s time to replace skirting on your mobile home, then it’s time to explore your options. So, what do you use for mobile home skirting? There are many materials you can choose for skirting your home. For this article, we chose DURASKIRT™ brand mobile home skirting for obvious reasons.
To replace skirting on a mobile home, begin by planning materials, sketching drawings, and adding dimensions so you can make a material list.
Order new skirting materials, preferably DURASKIRT™, making sure you have a place cleared for their arrival. (Getting prepared for DURASKIRT™).
Assuming this project is replacing old materials, you can start by taking down existing skirting.
Removal, Inspection & Restoring for Preparing to Replace Skirting on A Mobile Home
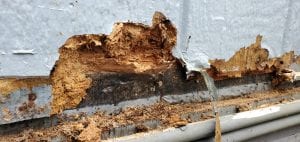
Termite damage in mobile homes caused by wood skirting attracts termites.
After removing aged skirting, you need to inspect the home’s rim-joist for rot, replacing the rotten or termite-eaten members if necessary.
Next begin to inspect the under-crawlspace blocking, tie-downs, belly wrap, piping, and vapor barrier for water or rodent damage. Moreover, this step is very important to replace skirting on a mobile home.
Also, looking underneath the vapor barrier, begin inspecting the soils for settling filling and compacting low areas. Obviously, installing a new skirting is easier on level earth.
Replace Skirting on A Mobile Home – Installing “ON Gravel or Dirt”
Start with leveling the grade around the home with a shovel, making sure to the soils are firm. If uncertain about soils ability to support skirting, I recommend using a compactor.
Now that the soils are level where you’re going to be installing new skirting, it’s time to proceed.
Begin by placing panels at corners of the home using the larger brackets and venting for the long sides and the short brackets on the ends.
It’s important to keep panels plumb as you go, and adding the venting before proceeding to the next skirting panel.
When all panels are set, it’s time to for caulking and concealing the joints.
It’s best to caulk from the bottom of the panels upward, scraping the excess with a used caulking tube. After scraping, use the joint concealing powder over the fresh caulking.
Alternatively, Installing New Skirting “On Top of Concrete”
The only difference in installing DURASKIRT™ panels on concrete is that you will need to cut them to height first.
When you replace skirting on a mobile home, start measuring the panels, making sure to leave a 1” gap between the top of the panel and the rim-joist.
If you’re considering buying a manufactured home, it’s probably crossing your mind to make manufactured home look like a house. Right? That’s exactly why DURASKIRT™ began. Because no other skirting or underpinning makes a manufactured home look like a house like DURASKIRT™.
At DURASKIRT we have managed to create a very durable long-lasting product giving homeowners a real foundation look. Moreover, the quality of our product is unmatched in the manufactured home industry. Indeed, DURASKIRT, LLC is a premium USA skirting manufacturer.
Overcoming challenges to make manufactured home look like a house
Making a manufactured home look like a house sounds simple. Right? Not so, because of the costs. Okay then you say, “what costs are you talking about. Please explain. Right?” When we began the process of developing DURASKIRT™ there were companies pouring footings and stem-wall facades.
Stem wall foundation (non-supporting façade)
This method requires rolling or crane setting the mobile home over the facade. Ridiculous and expensive right? Moreover, people were willing to pay the price because this method accomplishes the look they were after. However, many began thinking of more economical ways to do this.
Treated Plywood Skirting Method
One method that was tried and failed was painting treated plywood a grayish concrete color. Though, the finished product looked okay it soon was needing painting and eventually replacing. Likewise, the treated plywood in due course rots when back-filling.
Hardie skirting
When Hardie panels hit the market the mobile home industry jumped at the chance to use this product for skirting. Additionally, contractors were quick to paint this concrete color too to make a manufactured look like a house. But, like any other papier-mâché products this material hates ground moisture.
Ground moisture quickly taking its course within a few years this product began deteriorating. Besides, witnessing our customers replacing Hardie skirting with holes is sad. Also, this product was never designed for ground contact although one ingredient was cement.
Buy the right skirting products
Firstly,Mobile home skirting, products need to survive the environment of ground contact. Likewise, looking for ground contact skirting products are very few but worth it. Ultimately, DURASKIRT™ is an intelligent skirting choice for preventive maintenance.
For more information call DURASKIRT, LLC 360-419-9909.


Recent Comments