Shed Skirting – Closing Off the Bottom of Your Shed the Easy Way
There are several great ways to close off the bottom of your shed using shed skirting. Whether you own a shed, portable building, or outbuilding, this skirting for sheds hack is for you. Using shed skirting not only enhances the look of your shed but also provides a practical solution for keeping pests out. Not only will we discuss closing off the bottom of the shed, but we will touch base on how to hide the bottom of the shed.
How to Seal the Bottom of a Shed from Rats?
Let’s face it, sheds are necessary for protecting your stuff. So, knowing how to seal the bottom of your shed from rodents is a good thing. How you choose to close off the bottom of your shed can impact how safe the things you keep in your shed are from animals, weather, and rot.
The materials you use for skirting sheds need to protect your valuables from weather, pests, and ground moisture. They need to be durable, ventilated, and resist rodents.
Quite frankly, the best materials to choose from for shed skirting are made of concrete and bricks. I will explore the differences between each of these products below, explaining the best and easiest ways to install them so they will effectively close (hide) off the bottom of your shed.
Skirting For Sheds – Choose from These Materials:
DURASHEDSKIRT™ mobile home skirting makes great skirting for sheds too!
Brick is an age-old material that does an exceptional job protecting homes and, in this case, sheds from unwanted guests. Follow these simple steps installing bricks:
Tools you will need are masonry tools, brick saw, wheelbarrow, shovel, string, hammer, joint tool, trowel, and grout bag.
Excavate down below frost depth and at least 8” wide.
Set level grade marks by driving stakes into the soil and either cutting or marking them for the desired elevation and minimum 6” thickness.
Mix concrete to fill to the top of stakes and carefully grading to flatness although leaving a slightly rough surface.
Next, mix mortar for bricks then begin stacking them to the desired height. Some people may like to stack them high enough to protect the lower portions of the framing from the weather. If you do this use a good brick flashing on top to shed rain outside the bricks.
Cinder Block, less expensive compared to brick, is also a great material to use. Depending on the block thickness, 4”, 6”, or 8” you will need to provide an appropriate footing width. The installation is much the same as a brick so following the same steps and tool needs will suffice.
DURASKIRT™ skirting for sheds is by far the easiest way to close off the bottom of sheds (no footing required). Cutting these panels requires a diamond blade in a circular saw. The only tools needed for DURASKIRT™ shed skirting are a saw, shovel, and a caulking gun. For figuring materials, measure the outside lineal footage and desired panel height.
To save additional money, panels can often be cut down in half to save money. DURASKIRT™ is great for storage sheds. Ordering is also easy and delivery to your home is by LTL freight. Call 360-333-5498 and order your shed skirtingtoday!
Landscape Blocks are another way you can close the bottom of sheds. Can be used and does not require a footing either. The main drawback is their wider widths. Otherwise, they are a very good way of keeping varmints from taking up residence under your shed. You will also need to add a brick metal over the top of them.
Now that you know the best ways to close off (hide) the bottom of your shed, it’s time to stop procrastinating and do the job! It will be rewarding, and you’ll be glad you did it.
How Do You Skirt a Manufactured Home on a Sloped Lot?
Installing mobile home skirting on a sloped lot takes more than a basic skirting product. It takes a system built for uneven ground, long-term protection, and a clean finished appearance. After nearly 26 years of helping manufactured homeowners across the United States, DURASKIRT™ has become a trusted choice for challenging sloped installations.
Why Sloped Lots Need a Different Skirting Approach
Skirting a manufactured home on level ground is usually straightforward because the panel heights are often similar around the home. On a sloped lot, however, one side may sit much higher than the other, creating large openings, uneven gaps, and areas where ordinary skirting products can fall short. DURASKIRT™ is designed to solve those problems with durable concrete panels that can be adapted to the site.
On a slope, skirting must do more than hide the crawlspace. It should follow the grade, protect the underside of the home, resist damage, and give the home a finished, site-built appearance. DURASKIRT™ makes this easier because the panels can be planned around step-downs, framing, bracing, and uneven soil conditions.
As the manufacturer of DURASKIRT™, we are often asked, “How high can your mobile home skirting panels go?” Our answer is simple: “As high as you need.” With the right installation method, DURASKIRT™ can handle almost any height, making it an excellent option for homes placed on steep or uneven lots.
Plan Before Installation
Before installing mobile home skirting on a sloped lot, measure the height around the entire home. Start at the lowest point and continue to the highest point. These measurements will show where step-downs are needed and how tall the panels should be in each section.
Drainage is also important. Whenever possible, water should flow away from the home. Poor drainage can create moisture problems under the structure and shorten the life of some skirting materials. Because DURASKIRT™ concrete panels are designed for ground burial, they are especially useful where skirting must meet uneven soil, extend below grade, and still deliver a clean, professional look.
Choose DURASKIRT™ for Below-Grade Protection
Manufactured homeowners often want skirting that looks like a natural extension of the home—not an afterthought. That can be difficult with wood skirting because wood should not touch soil. On a sloped lot, this becomes an even bigger issue because some sections must extend lower than others. DURASKIRT™ solves this challenge by providing a concrete skirting solution that can safely extend below grade.
Why Ground Contact Matters
Ground contact is one of the biggest concerns when skirting a sloped lot. Many materials are not made to touch soil and may rot, warp, or deteriorate over time. Wood should stay at least 6 inches above the dirt, which often limits design options. DURASKIRT™ gives homeowners and installers more flexibility because it is made for below-grade use.
DURASKIRT™ is designed for ground burial, allowing the panels to be installed below grade and properly backfilled. This creates a stronger barrier around the base of the home, helps discourage rodents and pests from entering underneath, and provides the durability homeowners expect from a premium concrete skirting system.
Using DURASKIRT™ with wood can create the site-built appearance many manufactured homeowners want, even on a sloped lot. It also helps reduce the risk of rotting skirting, improves rodent prevention, and delivers a longer-lasting finish than many traditional skirting options. For the best results, keep wood at least 6 inches above the dirt and use DURASKIRT™ where below-grade protection is needed.
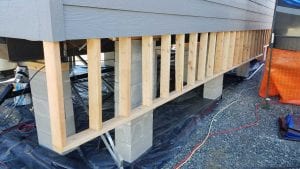
DURASKIRT™ Step-Down Framing for Sloped Lot Skirting
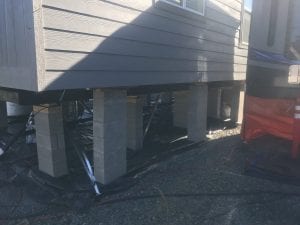
For a cleaner, stronger mobile home skirting installation on sloped lots, use standard framing materials with matching siding to create step-downs that follow the grade. This helps DURASKIRT™ concrete skirting panels deliver a finished, site-built appearance while supporting below-grade protection where the slope requires it. Install paper under the siding to help keep moisture out of the crawlspace. Important Step! After framing is installed beneath the home’s exterior rim joist, brace it back to the I-beams for added support. Proper bracing is essential. For 30″ of backfill, secure bracesto the steel beams no more than 24″ O.C. See photo.
Ready to solve your sloped-lot skirting challenge? Choose DURASKIRT™ concrete skirting panels for a stronger, cleaner, and longer-lasting mobile home skirting solution built for below-grade protection and a finished, site-built look. Contact DURASKIRT™ today to get expert help planning your project and order the right kit for your installation.
Get a Finished, Site-Built Look with DURASKIRT™
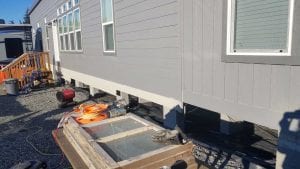
Many manufactured homeowners want their home to look more like a traditional site-built house, and DURASKIRT™ makes that goal easier to achieve—especially on sloped lots. When skirting simply follows uneven ground without a clear design plan, the result can look unfinished. Step-down framing allows the siding above the DURASKIRT™ panels to match the home, while the premium concrete skirting below handles the critical ground-contact area.
The result is a cleaner, stronger, and more permanent appearance that helps the home look like it was built that way from the start. Instead of one long, uneven skirting wall, step-downs create natural visual breaks that follow the slope. With the right layout for siding, lap reveals, trim, and DURASKIRT™ concrete panels, homeowners can achieve a durable, factory-direct skirting solution that adds curb appeal, below-grade protection, and long-lasting value.
Stop moisture, pests, and uneven skirting before they start. Choose DURASKIRT™ today for a stronger, below-grade concrete skirting solution. Contact us now to get the right factory-direct kit.
DURASKIRT™ Installation Tips for a Stronger Finished Look
Step-down framing follows the slope and prepares the home for DURASKIRT™ concrete skirting panels than install below.
Align framing with the home above for a cleaner manufactured home skirting installation.
Match the siding brand and style to help the home achieve a site-built appearance.
Keep lap siding reveals consistent for a professional, finished look.
Brace framing properly so backfilled DURASKIRT™ concrete panels perform as intended.
Keep wood at least 6 inches above soil and let DURASKIRT™ handle below-grade protection.
Use hot-dipped galvanized nails for a durable siding installation that complements DURASKIRT™ mobile home skirting.
Avoid Costly Skirting Mistakes with DURASKIRT™
One of the biggest mistakes in manufactured home skirting is placing wood skirting or framing too close to the soil. Moisture can lead to rot, repairs, and a shorter service life. DURASKIRT™ concrete skirting panels help solve this problem by giving homeowners a durable below-grade skirting solution where ground contact is required.
Backfilling before proper bracing is another costly mistake. DURASKIRT™ panels are built for strength, but the framing around them still needs solid support. Correct bracing, proper grading, and coarse rock backfill help create a stronger mobile home skirting installation that performs better over time.
Once the framing is braced, papered, and sided, install DURASKIRT™ as your premium mobile home skirting solution. For better below-grade protection, we recommend burying DURASKIRT™ at least 6 inches into the soil and backfilling with coarse rock to help block rodents from digging underneath.
DURASKIRT™ FAQs for Sloped Lot Skirting
Can manufactured home skirting be installed on a steep slope?
Yes. Manufactured home skirting can be installed on a steep slope, but the right system matters. Step-down framing, proper bracing, and DURASKIRT™ concrete panels designed for ground burial make sloped lot skirting cleaner, stronger, and more reliable.
How tall can mobile home skirting be?
Mobile home skirting height depends on the home, lot, and installation method. With DURASKIRT™, your skirting can be planned to fit the height your project needs, especially when installed with proper framing on sloped areas.
Should skirting be buried in the ground?
Some skirting materials should never be buried, but DURASKIRT™ is made for ground burial. Installing the panels at least 6 inches below grade and backfilling with coarse rock creates a stronger barrier and helps reduce rodent access under the home.
Why use a hybrid skirting method on a sloped lot?
A hybrid skirting method combines upper step-down framing and siding with DURASKIRT™ concrete panels near the ground. This keeps wood away from soil, improves below-grade protection, and helps the home achieve a clean, site-built look.
With proper step-down framing and DURASKIRT™ concrete skirting panels, a manufactured home on a sloped lot can look clean, permanent, and well protected. The finished result gives your home the site-built appearance many homeowners want, while adding the durability and below-grade protection ordinary skirting materials often lack. If you have not started shopping for a new mobile home, you may also want to read our article, “Finding The Best Mobile Home Brands.”
Don’t settle for skirting that fails on a slope. Choose DURASKIRT™ concrete skirting panels for lasting below-grade protection, a clean site-built look, and the strength your manufactured home deserves. Contact DURASKIRT™ today to get expert help and order the right factory-direct kit for your project.
Why Replace Polybutylene Water Pipes with PEX Piping in Your Manufactured Home?
Manufactured homes gained prominence from 1976. Up until 1996, polybutylene or PB pipes were the main material used for all the plumbing. If your home was manufactured within this period, chances are that they have a PB water piping system.
Almost all polybutylene piping systems use copper connectors. These connectors can fool you think that the entire piping system of your home is made of copper. If you want to be sure of the plumbing materials used in your manufactured home, conduct the inspections and subsequent replacement of the materials you do not want.
PB systems are known to start failing after 10-15 years. Beyond this time, you can expect the pipes to develop wholesale leaks.
Why replace the polybutylene water pipes?
They are no longer manufactured.
It means that you cannot find repair parts or fittings designed for this plumbing system. You cannot confidently repair your water system whenever there is a leak or blockage. Even if you get compatible fittings, they are usually expensive.
You are better off installing a material that is currently available in the market to make your future repairs and replacements easy. You can easily find metal and PEX materials in the market.
They can easily rupture.
A single rupture in a piping system can cause widespread water damage. PB systems are much prone to ruptures, especially as they age.
Oxidants in the water react with the material causing flaking. This process is continuous, eventually weakening the pipes. Homeowners’ insurance does not cover homes that have polybutylene plumbing because they deem them too risky.
Replacing PB is a safety measure, especially when the polybutylene pipes are old. Unfortunately, the remaining PB piping systems were installed in the 1990s, at least 20 years ago. Replacing them is now a matter of urgency.
Their appearance is misleading.
They deteriorate from the inside, which means you cannot observe the damage. You need a professional plumber to assess the status of the pipe. Sometimes you will need highly specialized tools to inspect the hard-to-reach areas.
They also rupture without warning causing extensive water damage, hence the need to get rid of them immediately when you notice them.
Why replace polybutylene with PEX piping in a manufactured home?
It is an upgrade to a superior product
Whenever you are doing any remodel or renovations project, you want to end up with a superior product. Certainly, replacing polybutylene with a superior product like PEX piping is recommended.
They are much flexible than polybutylene
If you buy the correct PEX piping grade, PEX-A or PEX-B, you can easily bend it to the desired liking. PEX-A is a bit expensive compared to PEX-B, making PEX-B the preferred grade for residential and commercial buildings. This flexibility makes it possible to reduce the number of connectors that you need to complete any connection.
PEX-C is not very flexible and may not be suitable for water piping systems. Overall, PEX simplifies the piping system by adding durability and ease of installation.
They are resistant to corrosion
Most other piping materials will start corroding every time they are exposed to oxidants, chemicals, or any other material that will encourage degradation. PEX pipes resist corrosion, preventing pinholes and pits common in piped water systems.
Color-coding
Unlike other materials that are not coded correctly, PEX is coded correctly, including red, blue, white, and gray. You can use white and gray in hot and cold-water systems. However, red and blue are used exclusively for hot and cold-water systems, respectively.
This color-coding is perfect for complex systems that require clear labeling and accuracy.
PEX is generally safe
Even in freezing conditions, the pipes provide the required expansion to prevent the pipes from bursting. If you are also worried about lead contamination, PEX is lead-free and can handle even high-pressure water sources.
If the installation is done professionally, you have nothing to worry about for a very long time. A good plumber will know where to use push fittings, compression fittings, clamps, or crimps connections.
No water hammers
Unlike in metal piping, water passing through PEX pipes will run smoothly without making noises. It can also fit snuggly into the existing metal pipes, especially those from the mains or the water heater. All you must do is to get the right connectors for the job. You do not need the soldering of the pipes.
You cannot use PEX in water heater connections, but it is perfect for ferrying hot water from the source because of its insulating properties. Besides, PEX degenerates quite rapidly when exposed to UV light. Do not use it outdoors because it will not give you reliable service.
Ensuring that the plumbing system of your manufactured home is in good condition is imperative. It can determine how long you can continue to enjoy the services of your property.
Tie-down professionals or Tie-Down pros are contractors who professionally install tie-downs for manufactured homes. Moreover, they are certified by state governing authorities. Certainly, they are very experienced in all sorts of tie-downs for manufactured homes.
Tie-Down Pros Explain Their Products & Services Well
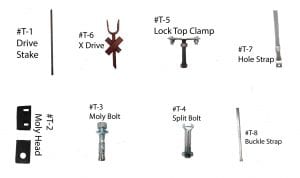
These are parts that tie-down pros use.
Most importantly, a tie-down professional has a great website that explains its services well. In fact, after reading through their website you come away with peace of mind. Surely, these people know and understand what they are doing, and I feel comfortable having them do my work.
They Are Experts in Manufactured Homes
Undoubtedly, a tie-down pro knows more than just securing a manufactured home to the ground. They are also grounded in knowledge about your home so they can spot other potential problems under your home. This can be detrimental to the longevity of your manufactured home.
What Sorts of Problems Can Be found Under A Manufactured Home?
The following items and more can be found under your manufactured home:
A sincere professional offering a speedy tie-down service also offers manufactured home re-leveling too. Moreover, they have a setup crew that can set new manufactured homes or moves existing manufactured homes. If you need blocking repaired they can help with that too. So be picky about who you choose because you may be needing more work done.
Tie-Down Pros Publicly List Their Prices
A true tie-down expert has set rates for installing tie-downs on your manufactured home. Understandably, this builds immediate trust with the public. You have probably been in that car dealership that only shows list prices or no prices at all. You would much rather deal with an honest dealership that sets their no-dicker sticker on the window. We also have had that salesman who asks you tons of questions to size up your wallet. I do not know about you, but it leaves me with a sick feeling in my gut.
Finally, A Tie-Down Pro Does Their Job Quickly and Efficiently


Recent Comments