Answering Common DURASKIRT™ Installation Questions
Q: The installation time for DURASKIRT™ mobile home underpinning can vary. For one person, it may take approximately one 9-hour day or up to three 7-hour days. For two people, the installation could be completed in about 4.5 hours or up to 10.5 hours.
Answer:
This question comes up frequently. A straightforward method is to time the installation of a single panel and then multiply that by the total number of panels your home requires. For example, the average home needs about 60 panels. If we assume it takes 5 minutes to install one panel, then 5 minutes times 60 panels, divided by 60 minutes per hour, equals 5 hours.
However, if your mobile home skirting installation takes longer, there’s no need for frustration. Some can complete an installation in under three hours, which is exceptionally quick. Most homeowners take about twice as long, and it could take even more time if the site isn’t properly prepared.
Remember the five P’s?
The adage ‘Proper Preparation Prevents Poor Performance’ is pivotal. If the five P’s are new to you, it’s crucial to embrace and internalize them. Before delving into preparation, it’s essential to underscore the concept of installation times, as understanding this is fundamental.
Time To Install
The installation time for mobile home skirting varies depending on the home. Typically, removing existing skirting takes 3–8 hours. After removal, inspect for rot at the attachment points and replace any decayed wood. Once preparations are complete, installing DURASKIRT™ panels ranges from 3 to 7 minutes each, based on skill and site conditions. A single person could finish in one 9-hour day or spread over three 7-hour days. With two people, installation might take as little as 4 1/2 hours or up to 10 1/2 hours.
For wet soil conditions, laying gravel or reaching drier soil is necessary before setting down the DURASKIRT™ fabric.
Should I insulate mobile home skirting?
In the north, older homes were constructed with minimal insulation. However, it is advisable to insulate the floors rather than the skirting. If the homes have wood or vinyl skirting, insulation is possible, but it is also necessary to ensure proper ventilation of the area. New constructions are well-insulated.
1″ to a 1 1/2″ gap from the top of the skirting panel to give good ventilation.
Begin by grading the site; measure and mark a 31″ point on your shovel handle or a stick. The shovel handle is most convenient as it’s already in use. Ensure the site is leveled so that there’s a 31″ distance from the rim-joist to the ground for the skirting panels. The panels should have at least a 1″ clearance from the ground but can allow up to a 1 – 1/2″ gap.
Receiving Your DURASKIRT™ Packages / Crates Now What? Manufactured Home Skirting Kits
Transport Times
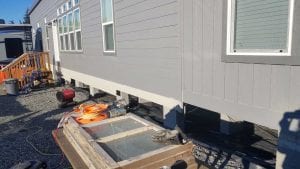
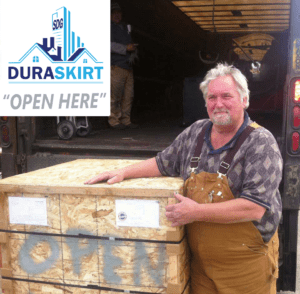
So you ordered your DURASKIRT™manufactured home skirting kits to place on your manufactured home, mobile home, tiny home, or post & pier house. Now, you can expect approximately two to five days for your skirting packages to process into shipping. Additionally, the crates look like the photo above when they’re ready to leave our factory. Once the skirting kitleaves our factory on an LTL truck, expect varying times for transportation up to seven days or in rare instances up to two weeks. In reality, we are speaking about the lower 48 United States shipping lanes.
Shipping Costs Are Flat Rate for Manufactured Home Skirting Kits
Surprisingly, most areas of the United States have very competitive shipping lanes and therefore, these results are low pallet shipping cost. We manufacture DURASKIRT™ skirting packages in a way that minimizes the freight charges. Moreover, so our customers gain affordable concrete skirting. Most recently, one of our customers met the delivery truck and received his mobile home skirting packages.
Preparation & Receiving
We ask that you be prepared for the LTL truck. Moreover, the trucks have a liftgate and use pallet jacks. For this reason, you will need a firm flat surface so they can pull the pallets off the liftgate and onto your flat, firm surface. Alternatively, you can provide plywood for protection of driveways, recommended, or over gravel and or firm grassy areas.
Note: Crate should be set level.
Safely Unpacking Your Crates
A level crate is vital for your safety. If, for instance, the crate must be set slightly out of level, then make sure the crate front labeled “OPEN HERE” (see photo) is facing up hill. Next, you can cut the straps with nippers or sheet metal cutters. Following this, look for the screws, TORX 20 or TORX 25, that secure the crate’s top and begin backing them out. Next, pull off the lid and place it aside.
Now, begin looking for the screws securing the front of the crate and back them out to pull the front panel marked “OPEN HERE” (see photo). Then you will see the lumber, cross-beams, that secure the panels from movement during shipping. When you’re ready to start your installation, you can back the side screws securing the beams on each side to get to your panels. You will notice that the panels are tilted backwards for your safety, using gravity to hold them from tumbling outward. This is why it was important to make sure the crates were set level or slightly backwards.
Important: Use safe lifting methods and unobscure pathways to begin moving the panels around your home.
Finally!
Can you picture yourself ready for a DIY skirting celebration? Talk to your family and friends and ask them if they will participate in a day of skirting with you. I am certain they will help after you inform them it will be the last time you will need their help as far as skirting for your home.
One customer responded, “DURASKIRT™ and Be Done.”
After your skirting is finished, you will be glad you made the investment in time, cost, and effort. Your home will be happy for years to come. I’m sure if it could, your home would smile and wink with pride. You can take advantage of purchasing DURASKIRT™ by calling 360-419-9909 or visit our website at www.Duraskirt.com. The next blog topic will be “How to Safely Open A DURASKIRT™ Crate.” Please keep in mind your safety first!
In 2024 Arizona State Skirting Options Now Include DURASKIRT™
For many Arizonians, poor mobile home skirting product options have plagued the manufactured home industry. So, the State of Arizona relented in passing regulations on what qualifies as manufactured home skirting. These regulations are rigorous.
Although, the regulations include the use of proprietary skirting products with installation instructions, as is DURASKIRT™. We still chose to qualify our product through engineers so that the public would be more aware of how great a product they’re choosing.
Still, we know first-hand, as we just finalized a seven-month obstacle course using two engineers to help clarify that which we already knew to be true. DURASKIRT™ is the best home skirting in Arizona. The highlights of our product are numerous.
Financing Reasons
Notably, when it comes to financing DURASKIRT™ quality is unmatched. For instance, Duraskirt™, mobile home skirting, qualifies for the MH Advantage Program if installed per our installation manual. Of course, a “Continuous Masonry Wall” can be constructed in varying ways with many choices of concrete or masonry materials. Best of all, Arizona State skirting options now include DURASKIRT™.
Moreover, the intent and purpose of MH Advantage Program is that their loans are backed up by long-lasting materials. Therefore, Duraskirt™, with Penetron™, tops the intent and purpose and outshines our competitors when it comes to long life.
Meets HUD Permanent Foundation Guide
Arizona State Engineer Report for Approving DURASKIRT™ Skirting Option:
Duraskirt ™ manufactured home perimeter skirt wall system was review for compliance with the current HUD handbook “Permanent Foundation Guild for Manufactured Housing” publication HUD[1]7584. It was found that the Duraskirt system meets all the requirements for foundation Type C.
These are systems that structurally support and anchor the home at the chassis, per section 100-2. Since perimeter walls may or not be used to structurally support or anchor the home, the Duraskirt ™ will meet HUD guidelines.
Furthermore, it is composed of rot resistant materials (concrete) and contains screened ventilation openings to meet the other requirements for Exterior perimeter foundations walls. The design and strength of the Duraskirt ™ system has generous safety factors for the applied loads of wind and seismic forces, plus the backfill loads against the skirting if installed per the manufacturer’s recommendations.
Backfilling Report 11.9 Times Stronger Than Needed
The design and strength of the Duraskirt ™ system has generous safety factors for the applied loads of wind and seismic forces, plus the backfill loads against the skirting if installed per the manufacturer’s recommendations. The 30” tall panel was tested for a full backfill height in a jig that simulated normal installation conditions.
Moreover, it was backfilled with compacted medium sand to the top of the 30” tall panel, with no significant deformation of the panel, nor any viable damage or signs of stress or an overloaded condition. The sand has measured dry weight at 110 PCF, and an internal angle of friction of 30 deg. This corresponds to an active lateral pressure coefficient of 0.33, or an equivalent fluid pressure of 36.3 PCF.
In fact, these values were used to analyze the panel for lateral moment cap city. The panels are reinforced with a 1” x 1” grid of 16 gauge, 60K psi wire, placed off-center to the panel thickness with plastic standouts when the forms are filled with 4000 PSI concrete mix. Analysis indicates this configuration has a factored moment capacity of 8857 in-lbs. The installed loading requires a maximum lateral bending moment of 744 in-lbs.
Engineers Conclusion:
Therefore, it has a calculated factor of safety of 11.9. This is about eight times the min required. These panels are very durable and should not ever become overloaded when installed and used according to the manufacturer’s recommendations.
Arizona State skirting option
We believe DURASKIRT™ is the answer for Arizona’s skirting problems.
Whether you’re outfitting a brand-new manufactured home or giving an older model a facelift, the correct installation of mobile home skirting is crucial for enhancing both the aesthetic appeal and the structural integrity of your home. This guide is designed to walk DIY enthusiasts through the essential considerations and effective strategies to ensure a successful and durable mobile home skirting installation.
Understanding the Basics of Mobile Home Skirting Installation
Mobile home skirting serves multiple crucial functions—it acts as a visual barrier, protects the undercarriage of your home from animals and debris, and significantly improves the insulation of your home. Properly installed skirting helps regulate airflow under the home, which is particularly important in maintaining temperature consistency and can lead to significant energy savings in varying climates.
According to the U.S. Department of Housing and Urban Development (HUD), ensuring that skirting is well-ventilated and maintains the necessary clearances to prevent moisture buildup is essential for the longevity of your home. HUD mandates that skirting materials should be durable, fire-resistant, and appropriate for the climate in which the home is located, with specific requirements for the size and spacing of ventilation openings to prevent moisture-related deterioration and energy inefficiency.
Statistical Insight on Skirting Benefits
Statistical data underscore the importance of effective skirting. Research indicates that properly installed skirting can reduce heating costs by up to 22%, as it minimizes unnecessary airflow that can lead to heat loss. Furthermore, about 15% of mobile homes experience under-home moisture issues that can be mitigated with correct skirting practices, showcasing the dual benefits of structural protection and energy efficiency.
Choosing the Right Materials
When selecting skirting materials, consider the following options:
Vinyl: Known for its cost-effectiveness and ease of installation, vinyl is a popular choice among homeowners. It is available in a variety of colors and textures, making it easy to match your home’s exterior. However, vinyl may become brittle and prone to cracking in extreme temperatures, which could require more frequent replacements in regions with severe weather conditions.Simply put, it’s not very durable.
Metal: Metal skirting, typically made from aluminum or steel, offers better durability and better fire resistance, though still not as durable as concrete. It stands up well against harsh conditions and can provide a sleek, modern look to your home’s exterior. The main considerations with metal are its potential to dent and the need for proper treatment to prevent rust in humid climates. Also, it does not provide as great an insulating effect as concrete.
Concrete Panels (e.g., DURASKIRT™): These provide the best in durability and insulation, meet rigorous HUD standards, and are excellent for all climates but come at a higher cost. Concrete skirting is highly resistant to weather-related damage, including warping, rotting, and pest infestations, making it a long-lasting investment.
Choosing the right materials is critical. We’ve had homeowners literally crying because when they were replacing their old vinyl or wood skirting after just a few years, they found rot in their homes which ended up costing them an additional $40,000 to repair.
Addressing Weather Concerns in Skirting Installation
Weather conditions play a pivotal role in the selection and installation of mobile home skirting. Different materials react differently to environmental stresses, and choosing the right type can significantly extend the lifespan of your skirting.
Hot Climates: In hot and dry regions, skirting materials need to withstand intense sun exposure without degrading. Light-colored vinyl or specially coated metal can help reflect sunlight and reduce heat absorption, which helps maintain cooler under-home conditions.
Cold Climates: In areas with cold winters, insulated skirting options such as foam-backed vinyl or concrete skirting can help keep the area under the home warmer, which prevents pipes from freezing and reduces heating costs.
Wet Climates: For homes in wet or flood-prone areas, skirting that offers excellent water resistance and allows for proper drainage is crucial. Elevated homes may benefit from adjustable skirting solutions that can be modified for better water runoff.
Insulation of mobile homes, especially underneath is important, but your home may not have the needed insulation. We’ve found that in the north, the older homes were made with little insulation under the home. For all these climates, DURASKIRT™ concrete skirting is specially formulated for resistance to rain and humidity as well as providing excellent insulation.
Preparing Your Site Properly
Effective preparation is crucial before starting your installation:
Inspect and Repair: Check the rim joist and other structural elements for damage. Repairs are necessary to provide a stable base for the skirting.
Level the Ground: Ensure that the ground around your home’s perimeter is even to avoid installation issues and ensure structural stability.
Ensure Accessibility: Keep enough space around your home clear to facilitate the easy movement of materials and installation work.
DIY Challenges and Practical Solutions
Labor & Material Portion
DIY skirting installation can present several challenges, particularly for those who are new to home improvements, due to a combination of factors related to skills, tools, material handling, and the precision required. Here are some of the main reasons why DIYers might find this project challenging:
Complexity of Task: Skirting a mobile home involves multiple steps that must be executed in the correct order and with precision. These include measuring accurately, cutting materials to the right size, ensuring level installation across potentially uneven ground, and securing the skirting effectively. Each of these steps requires a good understanding of basic construction principles, which might be daunting for beginners.
Tools and Equipment: Proper installation of skirting requires specific tools such as levels, saws, drills, and possibly more specialized equipment depending on the material used (e.g., heavy-duty cutters for metal or concrete). New DIYers might not have immediate access to these tools or the experience to use them safely and effectively.
Material Selection: Choosing the right type of skirting material to meet both aesthetic desires and practical needs can be complex. Factors to consider include durability, maintenance, insulation properties, and compliance with local building codes. Misjudgments in material selection can lead to premature wear, inadequate protection, or compliance issues.
Physical Labor: Installing skirting involves significant physical effort, including digging, lifting heavy panels, and lots of bending and kneeling. This can be physically demanding, especially for those who may not be accustomed to such labor-intensive activities.
Other Issues
Unexpected Issues: If you are removing old vinyl, wood, or metal skirting which didn’t properly protect your home, you may find mold, rot, or pests which cause additional issues to address. We had one crew that was replacing wood skirting and insulation. While they were pulling the old insulation, a possum dropped on one of the crew member’s chest. He ran out of there so quickly, screaming! He called the animal Dracula because of how it tried to bite him.
We had one crew that was replacing wood skirting and insulation. While they were pulling the old insulation, a possum dropped on one of the crew member’s chest. He ran out of there so quickly, screaming! He called the animal Dracula because of how it tried to bite him.
Weather Conditions: The process can be affected by external conditions such as wind, rain, or extreme temperatures, which can hinder the installation process or affect the curing and settling of materials like concrete.
Regulatory Compliance: Understanding and adhering to local building codes and HUD standards (for the U.S.) can be challenging. These regulations might dictate specifics about ventilation, material types, and installation methods, which if not followed, could lead to fines or the need to redo the work.
Problem-Solving Skills: Unexpected issues often arise during home improvement projects. For instance, the ground may not be as level as initially thought, or existing damage to the home’s structure could require additional repairs before proceeding. Effective problem-solving and adaptability are crucial, skills that typically improve with experience.
These factors combined make DIY mobile home skirting installation a challenging project, particularly for those new to DIY tasks. It requires a balanced mix of practical skills, physical labor, and attention to detail, all of which are developed through experience and education in home improvement projects.
Step-by-Step Guide to DIY Mobile Home Skirting Installation
Measure and Plan: Calculate the required amount of skirting material by measuring the perimeter of your home and the height from the ground to the base.
Material Selection: Choose materials that align with your home’s style and your climate’s demands.
Installation: Start from the corners and proceed around the home, ensuring each panel is level and securely attached.
Sealing and Securing: Apply sealing materials to fill any gaps, enhancing both the insulation and the security of the skirting.
Final Inspection: Conduct a thorough inspection from various angles to ensure everything is properly secured and visually appealing.
Ensuring Success in Your DIY Mobile Home Skirting Project
Purpose of Skirting: Enhances aesthetic appeal and structural integrity of mobile homes. It acts as a visual barrier, protects from animals and debris, and improves insulation.
HUD Regulations: Skirting must be well-ventilated, maintain necessary clearances to prevent moisture buildup, and meet specific durability and fire-resistance standards appropriate for the climate.
Statistical Benefits: Properly installed skirting can reduce heating costs by up to 22% and mitigate under-home moisture issues, improving both structural protection and energy efficiency.
Material Choices:
Vinyl: Cost-effective and easy to install; available in various colors and textures but may become brittle in extreme temperatures.
Metal: Offers better durability and fire resistance. Indeed it’s ideal for variable weather but can dent and may require rust prevention in humid climates.
Concrete Panels (e.g., DURASKIRT™): Highly durable and insulated, meets HUD standards, resistant to weather damage but more expensive.
Weather Concerns:
Hot Climates: Skirting materials should withstand sun exposure and reduce heat absorption.
Cold Climates: Insulated skirting options are beneficial for preventing pipes from freezing and reducing heating costs.
Wet Climates: Skirting should offer water resistance and proper drainage, especially in flood-prone areas.
Site Preparation:
Inspect and repair any structural damages.
Level the ground to avoid installation issues and ensure stability.
Maintain clear access around the home for material and tool movement.
DIY Challenges:
Complexity of Task: Requires precision in measuring, cutting, and installation.
Tools and Equipment: Specific tools needed which may not be readily available to all DIYers.
Material Selection: Needs careful consideration of durability, maintenance, and insulation properties.
Physical Labor: Demanding effort required, which might be challenging for some.
Weather Conditions: External conditions can impact the installation process.
Regulatory Compliance: Must adhere to local building codes and HUD standards.
Problem-Solving Skills: Necessary for addressing unexpected issues during the project.
Mobile Home Skirting Installation
Installation Steps:
Measure and plan the required amount of material.
Select materials that fit the home’s style and climate needs.
Ensure each panel is level and securely attached.
Seal any gaps to enhance insulation and security.
Conduct a thorough final inspection to ensure secure and visually appealing installation.
Additional Resources: Encourages consulting with skirting experts or accessing detailed installation videos for further guidance.
Finally, by following the guidelines outlined in this guide, homeowners can confidently undertake their own mobile home skirting projects. Moreover, enhancing both the curb appeal and the structural integrity of their homes. Also, from selecting the right materials to addressing various weather conditions and preparing the site properly. For instance, each step is crucial for achieving a durable and aesthetically pleasing result.
Remember, while DIY projects can be challenging, particularly for beginners, the right preparation and understanding helps lead to successful outcomes.
For further assistance, don’t hesitate to consult with skirting experts or utilize detailed installation videos provided by manufacturers like DURASKIRT™. Best of all, with patience and careful execution, your DIY mobile home skirting will significantly improve your home’s value. Especially, the efficiency and compliance with safety standards.
Skirting for Manufactured Homes Made to Look Site-Built
Considering community desires today, manufactured homes must be able to fit into residential neighborhoods. In order to accomplish this, the home essentially needs to look site-built. This is where concrete mobile home skirting is useful.
Most often, site-built homes have a poured-in-place perimeter foundation, stem wall, and footing. Calling this a perimeter foundation for a manufactured home is wrong. Just because it can support the weight of the home on the perimeter does not mean it is a foundation. In some ways, this can be detrimental as it is subject to weather and moisture, not to mention it gets in the way of properly securing the tie-downs. The better system is to support the structure under the home, tucked away from nature’s elements.
Manufactured homes are supported away from the perimeter of the home. This is a great design but leaves a distinctive space beneath the manufactured home. So, how do you take a great design still find a way to skirt match site-built structures? Well, there are a couple of methods to accomplish this.
The stem-wall foundation. The first method is pouring a stem-wall foundation, although entirely unnecessary, around the perimeter. This methodology is costly in requiring a manufactured home to be lifted over and set inside the wall. Although, sometimes the wall can be poured under the home after the setup. Obviously, many contractors loathe doing this for customers.
Concrete mobile home skirting kits. Installing concrete mobile home skirting kits can give an appearance similar to a poured stem-wall foundation. However, Concrete mobile home skirting installation can be done without removing the manufactured home, thus making it much simpler.
DURASKIRT™ Mobile Home Skirting Kits
Consequently, the most popular method is using concrete skirting for manufactured homes like DURASKIRT™. The system consisting of concrete boards or panels set up around the perimeter is a genus. This system serves the following purposes:
Guarding the underfloor with concrete.
Site-built look.
Meets FHA & VA loan requirements.
A long-lasting skirting solution.
Best for matching residential neighborhoods.
Two more reasons for choosing DURASKIRT™ concrete skirting for manufactured homes are simple installation and great customer support.
How Do You Skirt A Manufactured Home on A Sloped Lot?
If you have a sloped lot for your mobile home, you may know that mobile home skirting installation on sloped lots can be a challenge. For almost 25 years, we have been skirting manufactured homes across the United States. Sometimes, though, it can be a thought-provoking experience.
Being the manufacturer of DURASKIRT™, we are sometimes asked, “How high do your mobile home skirting panels reach?” Our answer is always, “as high as you need.” The reason we say that is because we have ways to accomplish almost any height.
Use DURASKIRT™ For Breaking Through the Ground
There has always been a demand for mobile home skirting to look like an extension of the home. This, however, is a problem for wood skirting as wood shouldn’t be in contact with the soil. This is not a problem for DURASKIRT™, since it is made for ground burial. A hybrid solution can also solve the issue of a sloped lot.
By using both DURASKIRT™ and wood, you can achieve the site-built appearance for manufactured homes that are on sloped lots. Just imagine, no more rotting skirting and tremendous rodent prevention. We recommend at least a 6” distance between wood and the dirt. So, plan your siding step-downs accordingly.
How to Frame Step-Downs on Sloped Lots
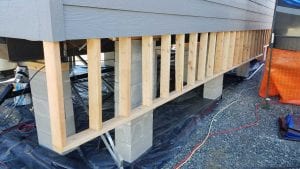
Using standard framing materials and siding to match, extend siding to form step-downs that conform to the slope. Remember to add paper under the siding to prevent moisture from entering the crawlspace. After the framing is installed under the homes’ exterior rim-joist brace, it back to the I-beams. See Photo.
Things to Keep in Mind
Framing lines up with house above.
Siding matches brand and style.
Showing the siding and framing stepping down. Ready to install DURASKIRT™ concrete panels below.
Lap siding reveals are same as home.
Framing is braced adequately to support back-filling DURASKIRT™.
Wood is no closer than 6” away from soil.
Use hot-dipped galvanized nails into siding.
Once all the framing is braced, papered and sided, it’s time for the mobile home skirting installation by adding DURASKIRT™. We recommend digging DURASKIRT™ into the soil a minimum of 6” and back-filling with a coarse rock. This helps to prevent rodents from digging under the mobile home skirting.
Finally, your home will look like a site-built home. Your friends and neighbors will be surprised to know it is in fact a manufactured home. Furthermore, if you haven’t begun your search for new mobile homes, you may want to read our article “Finding The Best Mobile Home Brands.“
Controlling any projects costs are important. For this reason, we feel the best skirting product for controlling manufactured home skirting prices is DURASKIRT™. Especially when you consider all the costs involved topped with future savings. Not to mention, DURASKIRT™ concrete panel skirting have been in production since August of 2000. Go to DURASKIRT™ Cost!
Lean Production
Most noteworthy is the manufacturing processes have changed by introducing lean manufacturing techniques. These advancements ensure the panels are stronger and more durable. Additionally, these revisions help in streamlining manufacturing. With a leaner manufacturing process and control system the benefits are both better production and lower costs. Hence, DURASKIRT™ is more readily available and consistent.
A Skirting to Invest In
Trying to find manufactured home skirting prices? Are you considering all your costs? Look into the cost of DURASKIRT™.
Although they’re primarily sold for manufactured home skirting kits the concrete panels are also bought for other purposes. Today DURASKIRT™ kits are shipping to home sites throughout the United States. Moreover, the costs of these kits are very competitively priced when considering the overall costs over time. Of course, DURASKIRT™ is an investment.
Even more, two unique aspects to this system is the engineering and Hidden-Vent System. Primarily, the engineering helps homeowners get better financing rates. While the Hidden-Vent System, allows unrestricted air-flow under the home. This eliminates dead air, that normally would coagulate under the home.
Moreover, coagulating air can have a high moisture content. Truly, damp air can be detrimental to your mobile home. Moreover, damp crawlspaces push water into the insulation which in turn has adverse effects on R-Values. Finally, decreased R-values can cause heating and cooling costs to go on the rise.
Other Hidden Cost Considerations for Manufacture Home Skirting Prices
Furthermore, skirting can cause short- and long-term hidden costs. For instance, plywood or vinyl skirting can deteriorate rather quickly. Consequently, left unchecked can cause severe and costly damages to your home. More so, rodent infestation.
The results could be replacing insulation, water lines, polluted vapor barriers, and of course skirting replacement. Therefore, we recommend to choosing a skirting wisely.
Choose Your Skirting Wisely
For more information on DURASKIRT™ Pricing and the product please visit DURASKIRT.com.
DURASKIRT™ November 06, 2022 – Price Drop Story – MAKE DURASKIRT™ INDUSTRY STANDARD!
The DURASKIRT™ price drop happened when a large developer approached me asking if we can do better with our pricing. If so, they would be awarding us with 500 plus homes over a two year period. This inspired me to test a method I have been wanting to try in production for years Making DURASKIRT™ Industry Standard. So, we tried it and it succeeded better than expected. Unfortunately the developer backed out before I had our volume pricing fully calculated thus, leaving me with hundreds of thousands in extra inventory. Therefore, I had a problem. But, a good problem, that is, for you.
We now had our hard numbers for volume pricing and plenty of product in stock. Fortunately, for our retail customers, we needed to sell off the extra inventory to pay off our suppliers. Thus, we did a huge price reduction. Personally, I would rather sell to the public a great product at a more than fair price. Besides, we have the best service in our industry and I am pretty sure we are on our way to making DURASKIRT™ Industry Standard skirting product in the United States.
Here Is What Our Advertisement Said….
11/06/2022 Note from owner/inventor about Higher Volume Price Drop:
“When I invented this American-Made skirting product the words “Industry Standard” came to mind. Thank all of my customers over the past 23 years for pushing me toward my goal. I know price has always been a factor but quality has always been number one. We’re pleased to announce with the help of our new manufacturing facility and largely to our employees we are announcing a price drop of approximately 15%. I will continue to push towards the goal of DURASKIRT™ one day being known as the “Industry Standard” product for skirting your manufactured home.”
PRICE DROP MESSAGE 1/14/2023 | HELP MAKE DURASKIRT™ INDUSTRY STANDARD!
We announced the 20% added discount late last year. The message said, “To Add: As a result of being overzealous we accidently made too much DURASKIRT™ and need your help clearing some inventory. We made too many 30″ and 37” (CMU) panels so enjoy this short time 20% off discount.” We are now sold out of this stock but we decided to keep our overzealous workers producing. As long as we keep selling kits at this rate why stop the sale? Keep buying and we will keep producing!
Manufactured Home Skirting Kits, Follow These Do’s and Don’ts When Purchasing!
If you own a manufactured home, you’re likely required by local law to put skirting on it. However, before you simply reach for the first mobile home skirting kits you can find, take advantage of these dos and don’ts. They’ll help you make a good choice and give you more bang for your buck!
— DO purchase direct from DURASKIRT™ – Not Home Depot or Lowes
We have always sold our skirting and underpinning kits directly to the public. So when searching for DURASKIRT Lowes call us 360-419-9909!
— DO pay close attention to how it’s made
All manufactured home skirting kits are not created equal. Some are made with vinyl while others are made with aluminum or concrete. There are brands that have special vents to even out airflow. While others have a finish that’s designed to look like stacked stones. Still, more boast of being the best cold weather skirting product.
Bottom line — there’s a variety of options out there, so do some homework! For example, learn about the durability of different materials (concrete skirting, vinyl, and aluminum) and additional expenses which may come up over time if the skirting material doesn’t hold up (rodent infestations, etc.) We think you’ll find concrete skirting is more effective and durable than vinyl or aluminum and will save you money in the end. Also, understand how air circulates inside your crawl space, and thus, why a special vent would be important. The more informed you are, the better-finished product you can purchase!
— DO buy your manufactured home skirting kits from a company that’s happy to help!
Some manufactured home skirting kit manufacturers only care about making money. Once they’ve sold you a kit, they could care less if you struggle to install it. Others intentionally make the instructions difficult to comprehend so that you give up and hire them (or their buddies) to install everything for you.
You can do better than that!
A good manufacturer will be happy to help with your skirting even after your purchase has gone through. Specifically, they’ll have an instruction manual that’s written in plain English, and they’ll post videos and other tips right on their website. Sure, they’ll offer their own installation services, but they’ll also make it relatively easy for you to do the installation work yourself, instead of trying to get you to spend more money!
— DON’T take winter for granted
If you live in a place that gets a lot of snow and ice, you’re going to need a manufactured home skirting kits that can keep up with weather changes, extreme temperatures, and moisture. Because of the way it’s constructed, it isn’t good to let a bunch of snow and ice pile up against ANY type of skirting, but some kits are better prepared to deal with nature’s wrath than others.
Before you buy anything, talk to the manufacturer about how their skirting is going to withstand winter. If you don’t like the answer, look for another kit!
— DON’T forget about your other structures
Yes, it’s called “mobile home skirting“, but these kits can also be used to finish off your deck, above-ground pool, or hot tub. Skirting is alsowhat to put around the bottom of a shed or the storage building you’ve got sitting in the backyard. So, before you put away the calculator, add up the space these structures take up. Odds are some mobile home skirting will make them look AND perform better!
If you have determined it’s time to replace skirting on your mobile home then it’s time to explore your options. So, what do you use for mobile home skirting? There are many materials you can choose for skirting you home. For this article we chose DURASKIRT™ brand mobile home skirting for obvious reasons.
To replace skirting on a mobile home begin by planning materials, sketching drawings and adding dimensions so you can make a material list.
Order new skirting materials, preferably DURASKIRT™, making sure you have a place cleared for their arrival. (Getting prepared for DURASKIRT™).
Assuming this project is replacing old materials, you can start off by taking down existing skirting.
Removal, Inspection & Restoring for Preparing to Replace Skirting on A Mobile Home
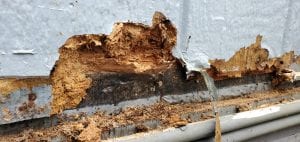
Termite damage in mobile home caused from wood skirting attracting termites.
After removing aged skirting, you need to inspect the homes’ rim-joist for rot replacing the rotten or termite eaten members if necessary.
Next begin to inspect the under-crawlspace blocking, tie-downs, belly wrap, piping, and vapor barrier for water or rodent damage. Moreover, this step is very important to replace skirting on a mobile home.
Also, looking underneath the vapor barrier begin inspecting the soils for settling filling and compacting low areas. Obviously installing a new skirting is easier on level earth.
Replace Skirting on A Mobile Home – Installing “ON Gravel or Dirt”
Start with leveling the grade around the home with a shovel making sure to the soils are firm. If uncertain about soils ability to support skirting I recommend using a compactor.
Now that the soils are level where you’re going to be installing new skirting it’s time to proceed.
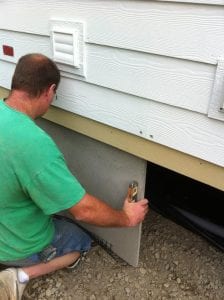
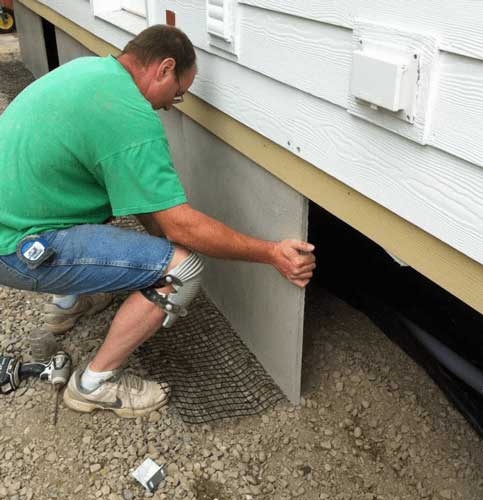
Begin by placing panels at corners of the home using the larger brackets and venting for the long sides and the short brackets on the ends.
It’s important to keep panels plumb as you go and adding the venting before proceeding to the next skirting panel.
When all panels are set it’s time to for caulking and concealing the joints.
It’s best to caulk from the bottom of the panels upward scraping the excess with a used caulking tube. After scraping use the joint concealing powder over the fresh caulking.
Alternatively, Installing New Skirting “On Top of Concrete”
The only difference installing DURASKIRT™ panels on concrete is that you will need to cut them to height first.
When you replace skirting on a mobile home start measuring the panels making sure to leave a 1” gap between the top of the panel and the rim-joist.
We hope this was helpful and informative. Please call DURASKIRT or email us if you need further guidance 360-419-9909 or email richardimus@duraskirt.com.
This website uses cookies so that we can provide you with the best user experience possible. Cookie information is stored in your browser and performs functions such as recognising you when you return to our website and helping our team to understand which sections of the website you find most interesting and useful.
Strictly Necessary Cookies
Strictly Necessary Cookie should be enabled at all times so that we can save your preferences for cookie settings.
If you disable this cookie, we will not be able to save your preferences. This means that every time you visit this website you will need to enable or disable cookies again.
Recent Comments